HubSpot & Zeo Integration | Zeo Route Planner

A step-by-step guide to Integrate Zeo Route Planner

with HubSpot seamlessly

Capture signatures, photos, or notes for proof of delivery
in the app – Quick. Simple. Secure.

Steps to Install Zeo Route Planner on HubSpot

Step 1 Access the HubSpot Marketplace

  • Login or sign up on HubSpot.
  • Navigate to the Marketplace option on the top taskbar and select Apps. This will redirect you to the HubSpot App Marketplace .


Step 2 Search and Install the App

  • Search for Zeo Route Planner in the marketplace.

Alternatively, use https://ecosystem.hubspot.com/marketplace/apps/zeorouteplanner to directly access the Zeo Route Planner app on the marketplace.

  • Open the app details and click on the Install button.


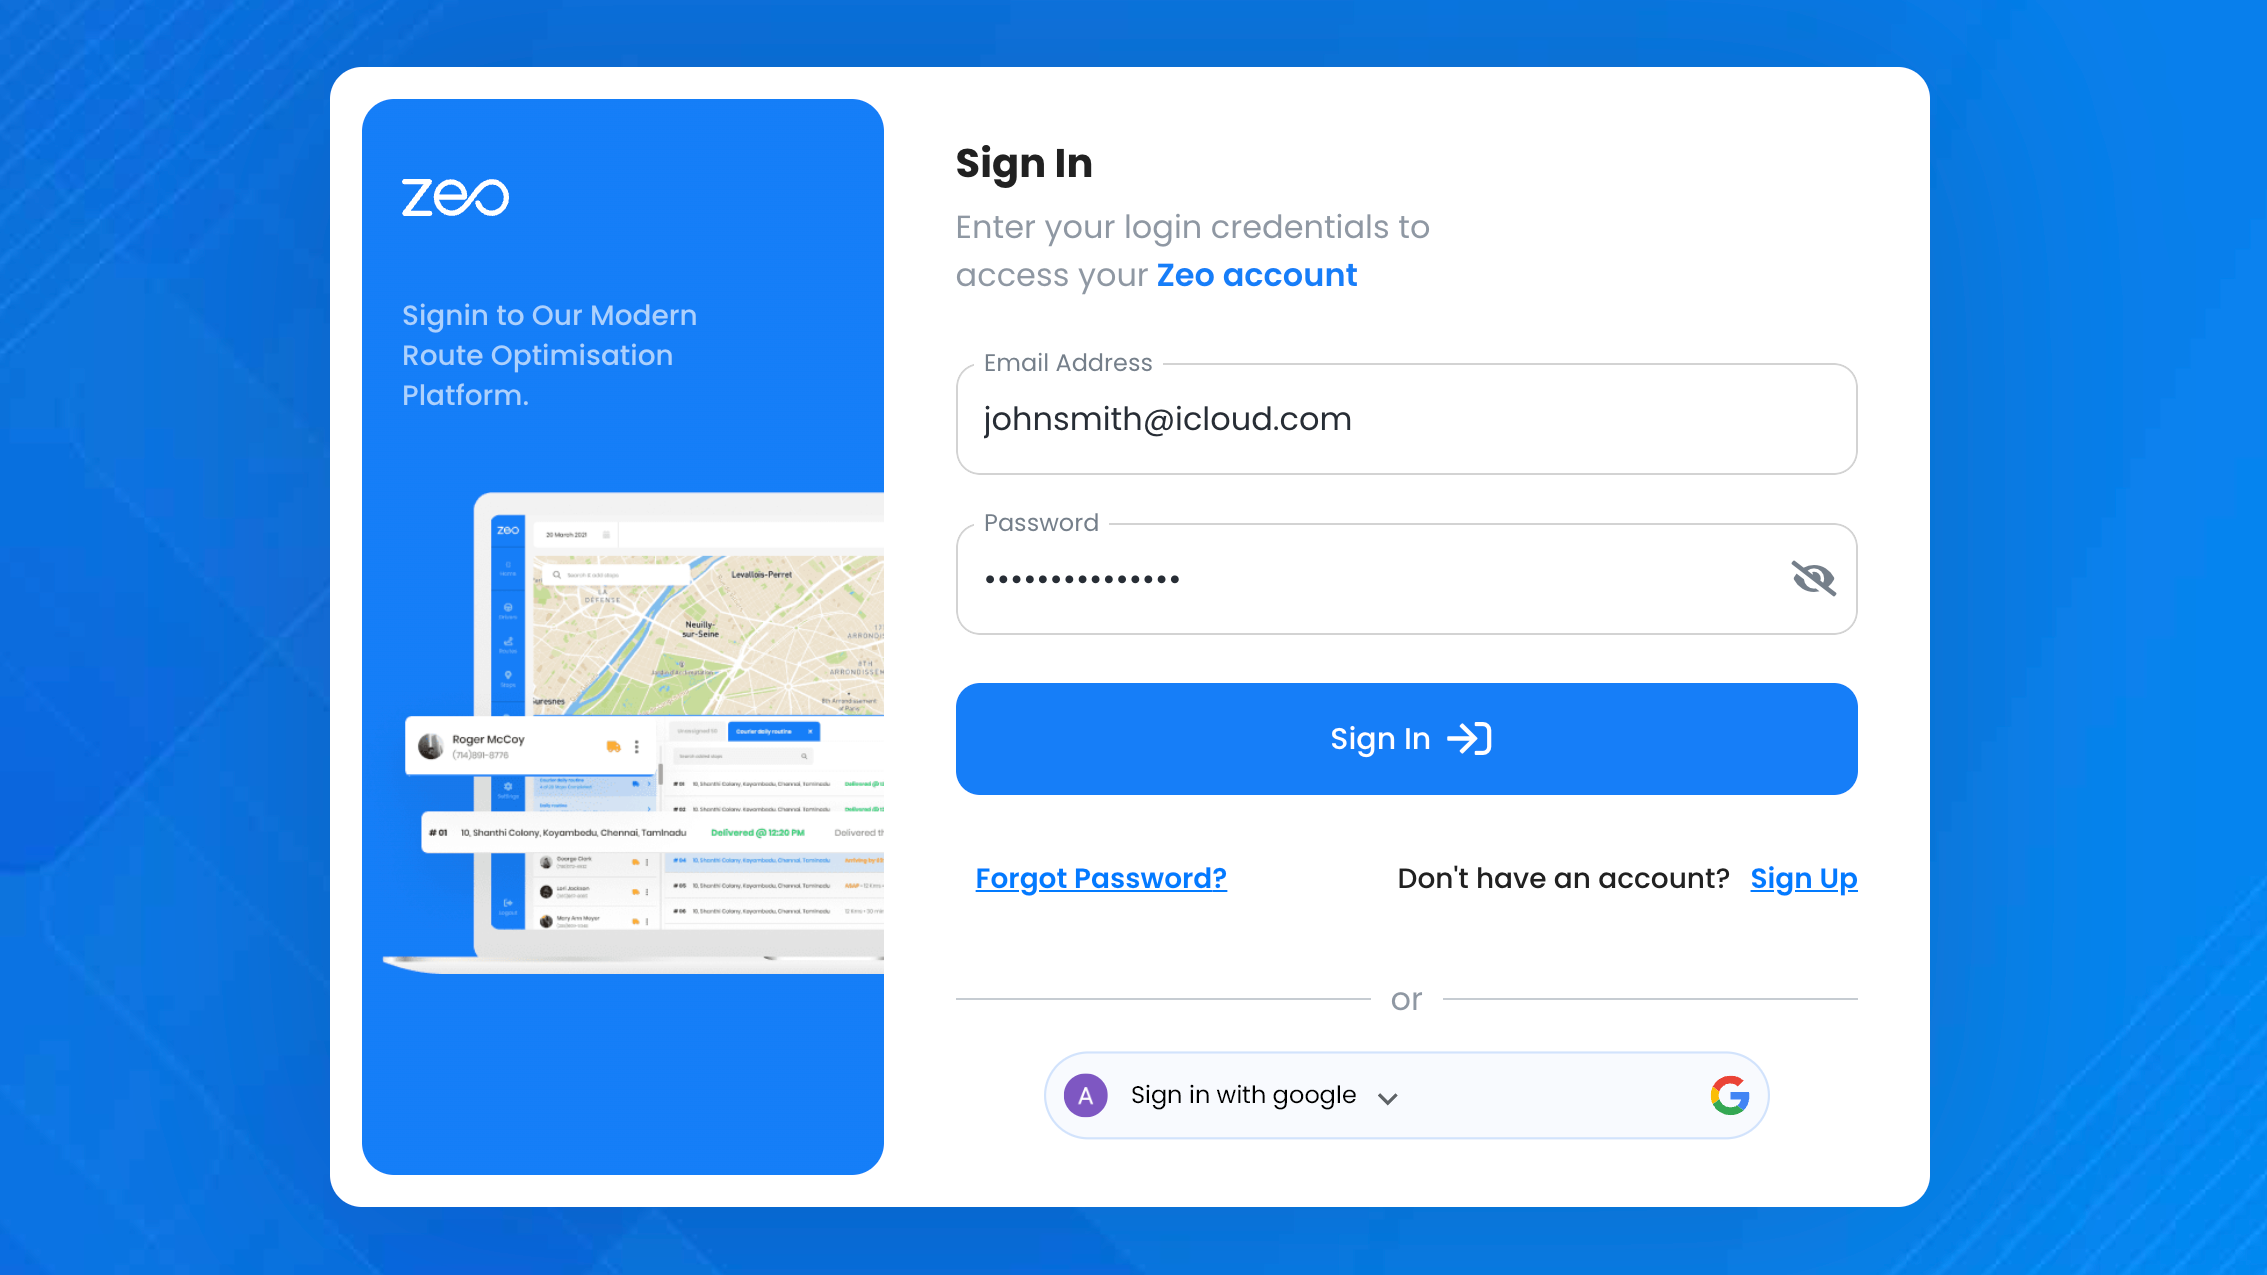
Step 3 Zeo Login Page

  • After clicking install, you will be redirected to the Zeo Login page.


Connect Your Zeo Account with HubSpot

Step 1 Sign Up/Log In

  • For first-time users, click on the “Sign Up” button on the login page and enter your email ID.
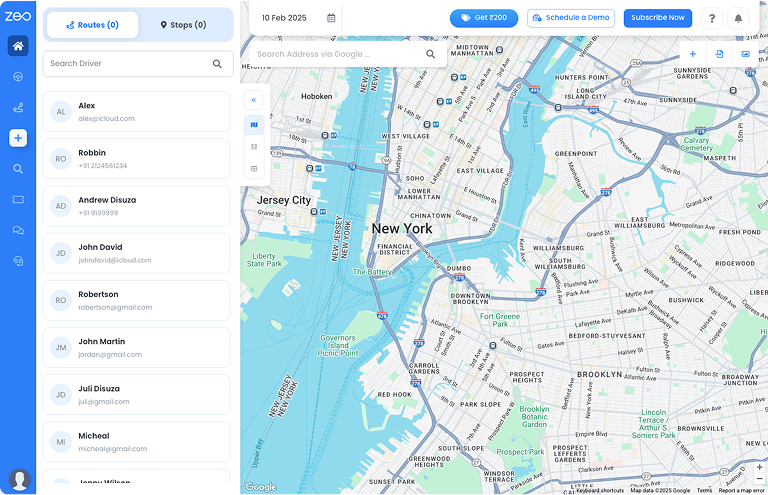
  • Complete the sign-up/sign-in process to access the Zeo Playground page , where you can view details about routes, drivers, and more.


Step 2 Access CRM Integration Settings

  • Click on your profile icon (bottom-left corner) and go to Settings .


  • Select the “CRM Integration” tab.
  • This page allows you to connect Zeo to major platforms, including HubSpot.


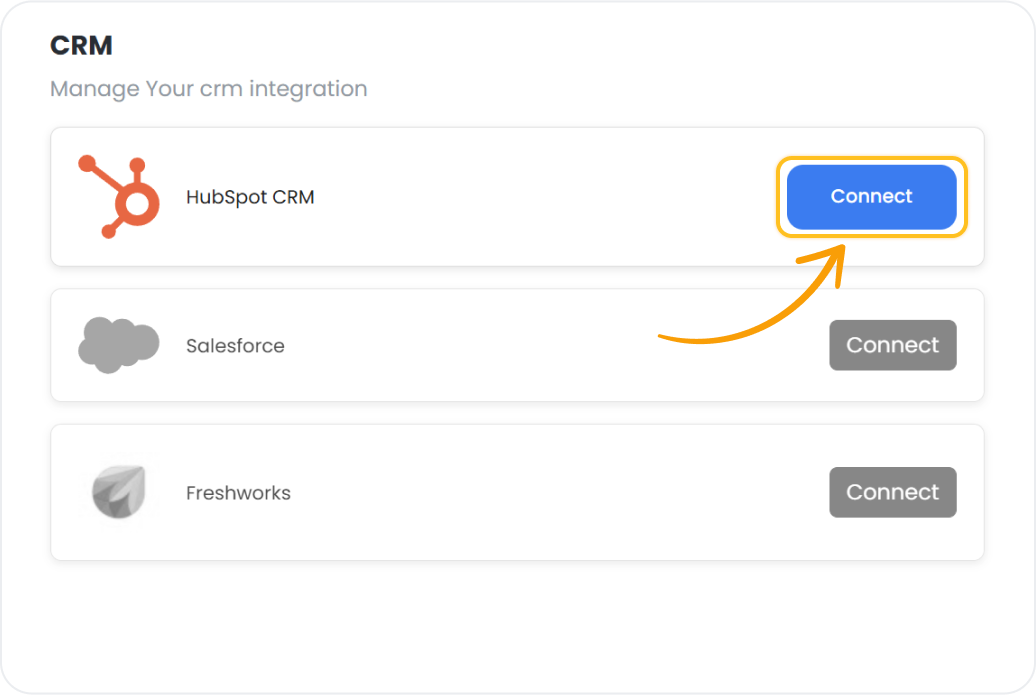
Step 3 Connect to HubSpot CRM

  • Click the Connect button for HubSpot CRM .
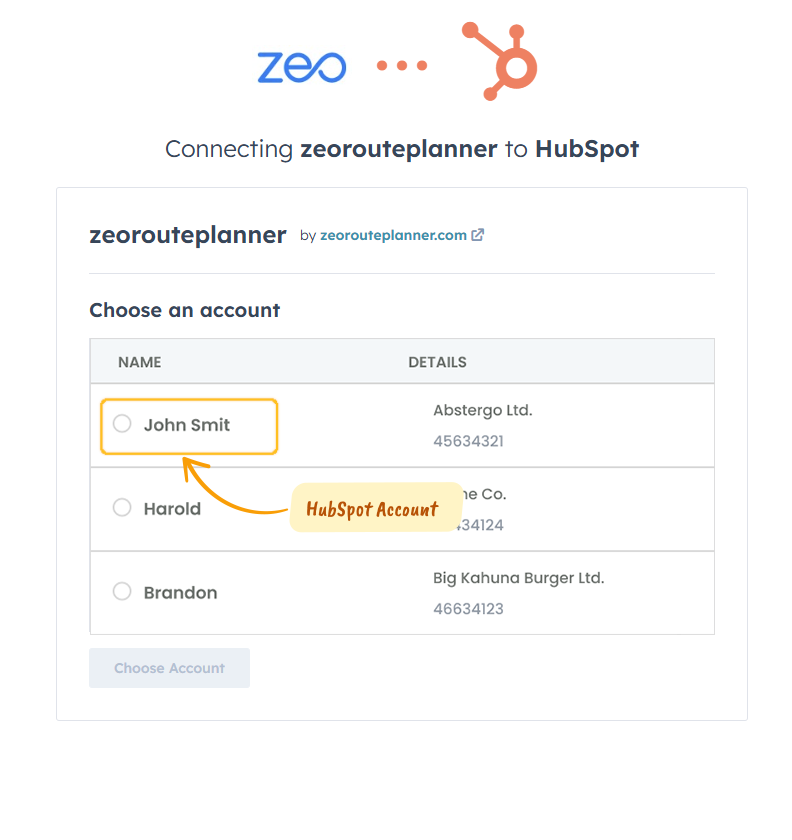
  • You will be redirected to HubSpot , where you’ll be prompted to select your HubSpot account .


Step 4 Grant Permissions

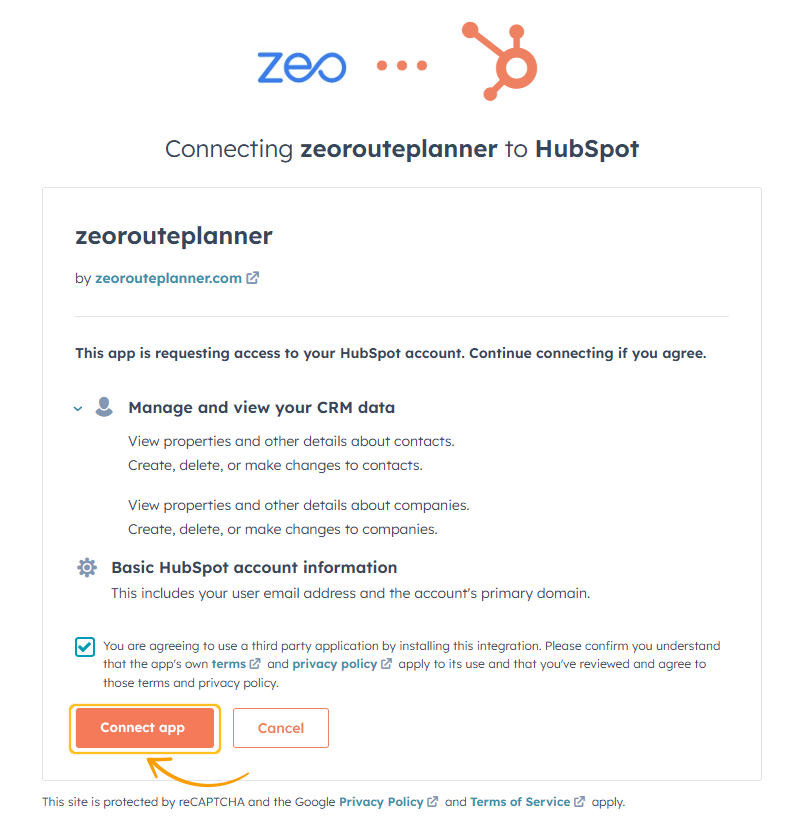
  • On the Access Permission page , Zeo will request access to your HubSpot data.


  • Click Connect App to finalize the integration.


Step 5 Integration Complete

  • Your Zeo account is now successfully connected to HubSpot.
  • You’re ready to create your first route using the Zeo-HubSpot integration.


HubSpot to Zeo: Effortless Contact & Company Sync

Accessing the CRM

  • Login to HubSpot.
  • Navigate to the CRM tab from the left taskbar.
  • You’ll see multiple CRM objects such as Contacts and Companies.


Adding Contacts

Option 1: Import Contacts

  • Click on Import (top-right corner of the Contacts page).
  • You can:

    • Import a file of contacts (refer to the sample import file available on the same page for format guidance).
    • Import contacts from HubSpot apps you’re using.
    • Import data from other CRM platforms (sign-up required).
  • Ensure that the address field is included for all imported contacts.


Option 2: Manually Add Contacts

  • Click on Create Contact (top-right corner).
  • Fill in the required details:

    • Email ID, First Name, Last Name, Phone Number, and Job Title.
  • Click Save to add the contact.


4. To add an address:

  • Open the contact and click Actions > View All Properties.
  • Search for the Street Address property, add the address, and click Save.


Next Steps for Contacts

  • Go to Zeo’s Dashboard .
  • Ensure the date is set to the present date in Zeo’s calendar.
  • View all contact addresses in the Stops tab.
  • Select necessary contacts and create a route.

    • Note: To create a route, you must add drivers and stores. Refer to Zeo’s FAQ page for detailed guidance.


Adding Companies

Option 1: Import Companies

  • Click on Import (top-right corner of the Companies page).
  • You can:

    • Import a file of companies (refer to the sample import file available on the same page for format guidance).
    • Import companies from the HubSpot apps you’re using.
    • Import data from other CRM platforms (sign-up required).
  • Ensure that the address field is included for all imported companies.


Option 2: Manually Add Companies

  • Click on Create Company (top-right corner).
  • Fill in the required details:

    • Company Name, Domain, Industry, Type, and Description.
  • Click Save to add the company.


4. To add an address:

  • Open the company and click Actions > View All Properties.
  • Search for the Street Address property, add the address, and click Save.


Next Steps for Companies

  • Go to Zeo’s Dashboard.
  • Ensure the date is set to the present date in Zeo’s calendar.
  • View all company addresses in the Stops tab.
  • Select necessary companies and create a route.

    • Note: To create a route, you must add drivers and stores. Refer to Zeo’s FAQ page for detailed guidance.


Quick Notes

  • Ensure addresses are added for both contacts and companies during import or manual entry.
  • For advanced features like adding drivers and stores, check the Zeo FAQ page for step-by-step instructions.

Automated Lifecycle Stage Updates in HubSpot with Zeo Route Planner

Lifecycle Stage Updates After Route Completion

  • Once a route is completed, the Lifecycle Stage of CRM objects (Contacts/Companies) with successfully completed addresses will be updated.
  • Initially, the lifecycle stage for a Contact or Company may be set to Lead, Opportunity, etc. After the address is marked as completed, the lifecycle stage will be updated to Customer.


How to Verify the Update

  • Navigate to the Contact/Company details in HubSpot.
  • Click on the Actions drop-down menu and select “View All Properties”.
  • You’ll be directed to the Properties page.
  • Search for “Lifecycle Stage” to view the updated value, which should now display as Customer.


FAQ’s & Walkthrough Video

How do I install the Zeo Route Planner extension in HubSpot?

Install the ZeoRoutePlanner application from the HubSpot Marketplace.

  • You will be redirected to Zeo where you can sign-up/login using Zeo credentials.
  • Once logged in, Go to Settings-> CRM Intergrations-> HubSpot Connect. Once you click on connect, you will be taken to HubSpot where you will select your account.
  • Select your HubSpot account when prompted and you will be directed to the Access Permission page.
  • This is the page where Zeo will ask to access the data on the HubSpot account. Click on Connect App.
  • Now you will be back on Zeo CRM integration page and your HubSpot account is successfully linked with Zeo.

How can I transfer my HubSpot CRM data to Zeo?

Zeo allows you to use your HubSpot CRM addresses directly. In order to use this feature, please make sure that you have your HubSpot account linked with Zeo. To know about this, refer How can I link my HubSpot account with Zeo.

  • Once you have the added the street address property for your CRM Object in Hubspot, their respective street address will be drectly available in the Stops tab in playground.
  • You can select these addresses and create a route using them.

How can I update my CRM stage on HubSpot once my address is successfully covered through Zeo?

Once the address is marked successful by the driver on the Zeo mobile app, the corresponding CRM object’s lifecycle stage will automatically be updated to “Customer.

How do I connect my Zeo Route Planner account to HubSpot?

  • Loggin to your Zeo account and go to Settings.
  • Select CRM Integration, You will see HubSpot as as option. click on Connect option.
  • For first time users, refer How do I install the Zeo Route Planner extension in HubSpot?
  • Once connection is successful, you will be able to the connection configuration and disconnect option on the page.

What happens if I uninstall Zeo Route Planner from HubSpot?

Uninstalling Zeo Route Planner will not affect your HubSpot account or data. Follow HubSpot’s Knowledge Base for steps to uninstall the app.

Additional Resources

Explore these articles for further assistance:

Still need help?

For any additional questions, reach out to our support team at any time.
Contact Us

Zeo Route Planner
Simplifying logistics!


Zeo Questionnaire

Frequently
Asked
Questions

Know More

How do I add stop by typing and searching? Web

Follow these steps to add a stop by typing and searching:

  • Go to Playground Page. You will find a search box in top left.
  • Type in your desired stop and it will show search results as you type.
  • Select one of the search results to add the stop to list of unassigned stops.

How do I import stops in bulk from an excel file? Web

Follow these steps to add stops in bulk using an excel file:

  • Go to Playground Page.
  • In top right corner you will see import icon. Press on that icon & a modal will open.
  • If you already have an excel file, press the "Upload stops via flat file" button & a new window will open up.
  • If you don't have an existing file, you can download a sample file and input all your data accordingly, then upload it.
  • In the new window, upload your file and match the headers & confirm mappings.
  • Review your confirmed data and add the stop.

How do I import stops from an image? Mobile

Follow these steps to add stops in bulk by uploading an image:

  • Go to Zeo Route Planner App and open On Ride page.
  • Bottom bar has 3 icons in left. Press on image icon.
  • Select the image from gallery if you already have one or take a picture if you don't have existing.
  • Adjust the crop for the selected image & press crop.
  • Zeo will automatically detect the addresses from the image. Press on done and then save & optimize to create route.

How do I add a stop using Latitude and Longitude? Mobile

Follow these steps to add stop if you have Latitude & Longitude of the address:

  • Go to Zeo Route Planner App and open On Ride page.
  • You will see a icon. Press on that icon & press on New Route.
  • If you already have an excel file, press the "Upload stops via flat file" button & a new window will open up.
  • Below search bar, select the "by lat long" option and then enter the latitude and longitude in the search bar.
  • You will see results in the search, select one of them.
  • Select additional options according to your need & click on "Done adding stops".

How do I add stops using QR Code? Mobile

Follow these steps to add stop using QR Code:

  • Go to Zeo Route Planner App and open On Ride page.
  • You will see a icon. Press on that icon & press on New Route.
  • Bottom bar has 3 icons in left. Press on QR code icon.
  • It will open up a QR Code scanner. You can scan a normal QR code as well as a FedEx QR code, and it will automatically detect the address.
  • Add the stop to route with any additional options.

How do I delete a stop? Mobile

Follow these steps to delete a stop:

  • Go to Zeo Route Planner App and open On Ride page.
  • You will see a icon. Press on that icon & press on New Route.
  • Add some stops using any of the methods & click on Save & Optimize.
  • From the list of stops that you have, long press on any stop that you want to delete.
  • It will open window asking you to select the stops that you want to remove. Click on Remove button and it will delete the stop from your route.

Zeo Blogs

Explore our blog for insightful articles, expert advice, and inspiring content that keeps you informed.

Financial Document Delivery: A 2026 Compliance Guide

Learn how route optimization makes financial document delivery secure, time-definite, and audit-ready across multiple branches or client sites.

Construction Delivery Management: Beyond Scheduling (2026)

Learn how construction delivery management combines scheduling, route optimization, and live tracking to cut delays and prove every delivery.

Route Planner App: The Honest 2026 Comparison Guide

Compare the top route planner apps by features, pricing, and use case. Find out which tool fits your business before you sign up for another free trial.


Xlork is a developer-first data import platform. It lets you embed CSV, Excel, and Google Sheets import into any app with AI-powered column mapping and schema validation. Explore free developer tools like JSON-to-CSV converters and color palette generators. No more building import flows from scratch — just drop in the Xlork SDK, sign up free, and ship clean data in minutes.